Fishing The Fly Scotland Forum

Sandy Nelson

November 2010 Flytying SBS entries
« on: 29/10/2010 at 08:03 »
Here is peter's (rabbitangler) entry for november.
 It kicks off this years SBS comp.

Good luck to all.

Sandy :z18


Ok folks hope this is the right place to post my entry - hey what the hell!! :z4 :z4

THE SHIPMAN'S BUZZER

Here’s one of my all time favourite dry flies on Stillwater. Initially designed by Dave Shipman in then late 70’s and popularised during the dry fly  revolution on still waters in central England’s reservoirs I first came across it as a freebie with a magazine – Trout fisherman I think. It was a size 12 and it caught me a few fish on ponds in the central belt. More recently I have been tying it in smaller sizes, down to 18’s for spooky fish in hot bright evenings.   

It really is a simple fly and quite easy to tie:

1.   Materials: Simple – hook (Lightweight I’ve used B 400), thread - black in this case, white poly yarn, pearly rib and your favourite dubbing – I have used fiery brown seal (though the original was antron) but I also use claret, black amongst others. F.B. is my favourite!


2.    Ok Hook in vice, flick to test the temper though I can’t remember the last hook which broke.


3.   Attach the tread at the eye (a wee tough of dubbing wax here will hold the thread after a couple of turns.


4.   Catch in the poly yarn for the wing and secure with a couple of tight turns


5.   Hold the wing up at about 45 degrees and wind in touching turns. This keeps the wing on top of the shank.


6.   Continue winding to the end of the shank of the hook.


7.   Now return the thread in open turns to the front of the fly.


8.   Catch in the rib. Originally it was pearl tinsel but the first fish you hook will destroy it so, after experimenting with two ribs, one tinsel one fine nylon I came across this, pearly strand wound round a nylon core. Think its called twinkle(Lureflash).
Pulling it down as you wind to the band will ensure it stays on the bottom of the hook.


9.   Dub the thread evenly with your chosen dubbing, keep it fairly fine.


10.   Wind the dubbing to just short of the eye of the hook.


11.   Wind the rib in an open spiral and tie off with a couple of turns of waxed thread.


12.   Snip off the excess rib material and whip finish the fly under the wing. I usually do two three turn whips one on top of the other – saves using varnish. Then trim the wings to length. Leave them long to start and trim as required..


13.   rough up the body with a wire brush or Velcro


14.   et Voila – finished!!


Apply floatant to the wings and the fibres sticking up when fishing the fly. Remember it should fish in the surface not on top. Fish it static or with short pulls.

Barry Robertson

Re: November 2010 Flytying SBS entries
« Reply #1 on: 29/10/2010 at 20:21 »
Nice step by step Peter, cracking fly for the first entry!
Looking forward to seeing the next entry  :z16

Mike Barrio

Re: November 2010 Flytying SBS entries
« Reply #2 on: 30/10/2010 at 16:12 »
Hi Peter ....... great stuff, thanks for an excellent fly to get the ball rolling :z16

The Shipmans has kind of gone out of vogue over the past few years, on Haddo at least, but a well tied version in size 12 to 16 is an excellent fish catcher!

Best wishes
Mike

Sandy Nelson

Re: November 2010 Flytying SBS entries
« Reply #3 on: 31/10/2010 at 12:02 »
This is a Sequence for a fly called a Polar Candy, it's a variation on the surf candy, which the Australians prefer for Tuna fishing.
You can tie them with Pink, Chartreuse, Olive or Grey backs.
I have spent many attempts trying to simplify the dressing and speed up the tying but i'm afraid the only the way to get the flies to look right and work properly is to employ some patience, as you will see from the sequence.

so ingredients are as follows.

Hook:     Varivas 2600st-v size 1 or Size 2/0, the dressing in the sequence is on a size 1.
Thread:  flat white for underbody, fine clear mono for the over body.
Underbody: Flat silver lurex.
Overbody: Mini pearl mylar.
Underwing: White Polar fibres.
Overwing: DNA holofusion, in this case Pink.
Eyes: 3/16ths flat red prism eyes (use 1/4 for the 2/0)
Epoxy: i prefer Z-Poxy 5 minute, but some of the UV cure stuff would probably work even better.

Step 1: Put the vice in the hook.


Step 2: Start winding on the white thread.


Step3: Tie in the flat silver lurex about level with the hook point and take thread back up to the eye.


Step 4: Wind lurex up in slightly overlapping turns and tie down.


Step 5: Whip finish and trim ends.


Step 6: Cut a piece of Mylar tubing to the right length, just slightly longer than the lurex body.


Step 7: Slide Mylar over the underbody.


Step 8: Using the mono thread , wind down over the mylar to the end and then back to the eye, tying it down fully.


Step 9: Select some Holofusion and tease out the ends so they have a tapered affect.


Step 10: Tie in the holofusion with the longer part forward over the eye approx 3 hook lengths. Tie down with 3 turns of thread.


Step 11: Next select some polar fibers, a decent sized bunch as per the picture, approx 1 thumb width at the base.


Step 12: Remove the under fluff by stroking the butt ends with your fingers (you could use a small comb, but i prefer the fingers) And discard the fluff.


Step 13: Tie in the polar fibers as tight as possible to the butt, as shown, with the fibers extending over the eye of the fly.
Gentle pull the holofusion so it is slightly longer than the polar fibers.


Step 14: Whip finish the mono, under the fibers and trim the tail of the holofusion to the length of the underbody.


Step 15: Mix up a small amount of epoxy.


Step 16: Apply the mixed epoxy to the underside of the fly covering the whole mylar portion.


Step 17: Apply some more epoxy to the top side of the fly working it into the butt ends of the holofusion and polar fibers.


Step 18: Finally apply some epoxy to the holofusion and polar fibers for about the length of the body. Do this to both sides.


Step 19: Now for the patient part, hold the fibers back, making sure they stay one on top of the other, and that the polar fibers spread out a little to give the fly some body. You will have to hold the fly like this for about 3-4 minutes.


Step 20: After 3-4 mins, the body should stay the shape you have held it in. make sure it is straight on the hook at this point as it is still pliable.


Step 21: Stick eyes on while epoxy is still tacky, one on either side :wink


Step 22: Check profile from above, it should look like this.


Step 23: Mix up another smallish quantity of epoxy.


Step 24: Apply the epoxy to both sides of the fly working it back to the bend of the hook. Make sure it covers the eyes and gets into the polar fiber just at the bend.


Step 25: Remove the hook from the vice and turn it by hand to ensure a the epoxy flows into the desired shape.


Step 26: once happy with the shape, put the fly in a fly turner for 10mins, to cure properly.


Step 27: Once it is cured the profile of the head should be like this, hopefully with as few bubbles as possible :roll


it should be lozenge shaped when viewed from above, like this.


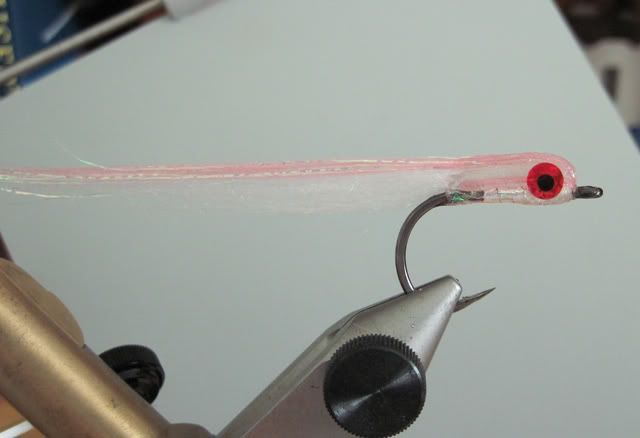
The finished fly in full profile, showing the correct proportions. I'm sure it would have its uses back in the UK too.


Have fun giving it a go :z16

Cheers

Sandy


Barry Robertson

Re: November 2010 Flytying SBS entries
« Reply #4 on: 07/11/2010 at 19:41 »
Right here goes,
A basic cruncher to try out  :z16
This fly fishes well in all sorts of variants from size 10 down to 14 's, for easyness i will tie this fly in a 10 so its easy to see each step clearly  :z18

Materials
Hook - Fulling Mill Nickel Comp Heavy weight size 10
Thread - UTC 70 Fl Fire Orange
Tail - Hen fibres from Hen cape feather
Body - Natural pheasant tail
Rib - Red wire
Thorax - Black / silver micro fritz
Hackle - Hen from same cape


Firstly place the hook in the vice and catch in the thread just behind the eye. Run the thread down to in line with the barb then back up to just below the eye.


Take some fibres from one of the feathers off of a hen cape for the tail, i like the ones right at the back with a nice 2 tone effect.


Catch in the fibres just behind the eye and run the thread down to in line with the barb. The tail should be the same length as the body, fold the tail over and check the proportions are right before you continue.

[/IMG]http://i429.photobucket.com/albums/qq20/bigtroot/P1040167.jpg[/IMG]


Once the tail is in place catch in your rib just in fornt of the tail and run the thread back up to just below the eye.


Take 4 strands of natural pheasant tail and tie in just behind the eye. tie in at the tips of the pheasant tail.


Run the thread down over the pheasant tail until again in line with the barb.


Bring the thread back up to just below the eye.
Catch the phesant tail with your hackle pliers and wind the fibres in close touching turns to around 3/4 's of the way up the shank of the hook.


Catch in fibres and secure in place with your thread, trim off the waste pheasant tail.


Now counter rib the pheasant tail using the red wire, secure wire with thread and trim off excess wire.


Catch in the Black and silver micro fritz just above the pheasant tail body.


Give the micro fritz 3 full turns and secure in place with thread and trim off excess.


Pick a hackle of suitable size , i like the hackle to be just about the same size as the lenth of the body of the fly.
Prepare the feather by stroking the fibres back and making space for thread to pass through when offering the hackl up to the fly.


Tie in the hackle and trim off the excess.


I give these types of flies 2 full turns of hackle then secure the hackle with the tying thread, at this point it looks a bit shabby but just trim of the stem of the hackle and  before you whip finish just sweep the fibres back towards the tail, this tidys things right up and now you have a proper looking cruncher.


Apply some varnish to secure the thread and jobe done, hope you like it  :z18


Mike Barrio

Re: November 2010 Flytying SBS entries
« Reply #5 on: 07/11/2010 at 22:06 »
Nice one Baz ..... excellent step by step :z16

Thanks for posting!
Cheers
Mike

Mike Barrio

Re: November 2010 Flytying SBS entries
« Reply #6 on: 07/11/2010 at 22:10 »
Loving these new flies of yours Sandy, so different from your wee spiders :z16

I reckon my trout would probably like Polar Candies, in the right sort of size of course :wink

Thanks for posting!
Cheers
Mike

Sandy Nelson

Re: November 2010 Flytying SBS entries
« Reply #7 on: 08/11/2010 at 11:41 »
Baz

Those are cracking photo's  :z16 what you using to get them, the colour balance is brilliant.

Sandy

Barry Robertson

Re: November 2010 Flytying SBS entries
« Reply #8 on: 08/11/2010 at 11:45 »
Its just a panasonic lumix 10 mega pixel DMC FS 62,
I tied the fly on my doorstep and took the photos in natural light, coldest fly i ever did tie  :z4

Sandy Nelson

Re: November 2010 Flytying SBS entries
« Reply #9 on: 08/11/2010 at 11:50 »
Cool, so it was all done outside :z16 brilliant.
The room i tie in has loads of natural light and it makes such a huge difference.

A great advert for the Lumix methinks :z18, lovely fly as well :z16

Sandy

Iain Goolager

Re: November 2010 Flytying SBS entries
« Reply #10 on: 12/11/2010 at 23:49 »
Lake/ Pond Olive Spider

I like to fish these straight across the wind either static or tweaked back in a nice ripple

 
Materials
Hook:       Dohiku HDN Size 12
Thread:      12/0,  14/0 Olive
Rib:      Small UTC Mylar Holographic
Body:      Light Olive Spectrablend
Hackle:      Olive Partridge


Place hook in the vise and catch in thread.


Offer up the rib to the hook, catch in and bind down along the shank, in touching turns, to a point opposite the hook barb (or where it would lie on a barbed hook). OR to a point where you would like the body to begin,  e.g.  a Clyde Style pattern.


Create a dubbing rope of Light Olive and form a tapered body up towards the eye of the hook.


Segment the body with the holographic tinsel and tie off at the point where the hackle will be formed.


Select and strip an olive partridge feather of the flue, stroke enough fibres backwards to satisfy a wrap / wrap and a half of hackle.


Tie in feather by the tip and remove excess fibres.


Wind one/ one and a half turns of hackle and tie off.


Remove Hackle stem and viola! A very simple but effective pattern to use when Olives are about on the Stillwater.


Iain

Mike Barrio

Re: November 2010 Flytying SBS entries
« Reply #11 on: 16/11/2010 at 19:55 »
Nice one Iain .......... you know I've got a soft spot for spiders :z4

Best wishes
Mike

Michael Buchan

Re: November 2010 Flytying SBS entries
« Reply #12 on: 16/11/2010 at 20:28 »
Nice fly Iain

Here is my attempt at a SBS for a Last Chance Cripple.  I think Rene Harrop invented the fly. Was thinking of getting his new book Learning from the Water anyone read it?

Apologies for the dodgy photos.

Hook  -Orvis Extra Fine Dry fly
Thread - Yellow Uni-Thread 8/0
Tail - Coq De Leon
Shuck - Tuft of Orvis Spectrablend Dubbing
Body - Orvis Rusty Brown Turkey Biots
Thorax - Pale Yellow Dry Fly Dubbing
Wing - Pair CDC Feathers
Hackle - Grizzly

Start by tying in a few Coq De Lean barbs about the lenght of the hook and a small tuft or dubbing.  Cut the dubbing about half the lenght of the tail


Tie in the Turkey Biot by the tip.


Wind the biot to the thorax region.


Dub a small ball for the thorax leaving enough room for the hackle and wing.


Tie in the two CDC feathers with the tips extending over the eye.  Cut off the ends in-line with the end of the thorax.


Tie in the hackle.


Wind a couple of turns and tie off under the front wing.  Whip finish and thats it.


Michael

Mike Barrio

Re: November 2010 Flytying SBS entries
« Reply #13 on: 16/11/2010 at 21:03 »
Great stuff Michael ..... Thanks for posting :z16

Best wishes
Mike

Barry Robertson

Re: November 2010 Flytying SBS entries
« Reply #14 on: 19/11/2010 at 10:10 »
Great step by steps lads but i am sure we can get more than 5 efforts!
Looking forward to seeing a few more  :wink


Barrio Fly Lines - designed in Scotland - Cast with confidence all over the world

Barrio Fly Lines

Designed in Scotland

Manufactured in the UK

Cast with confidence all over the world

www.flylineshop.com